
Instead think basil and tomatoes. Think basil turned into pesto with fresh tomatoes and asiago cheese...


I'd never made either of these pizzas before, but I was very surprisingly pleased with how they turned out. I heard lots of positive feedback from my taste testers who didn't flinch at the idea of pizza for breakfast! My taste testers are tough like that - regular taste testing Marines, I tell ya! One lady asked when I was opening the restaurant, and that both of these pizzas should be on the menu! Another friend said that G should open a school for smoking meats (and she would send her husband!) and I should open a school for baking (and her husband would sign her up!) Some had trouble deciding which one they liked best - so I say just make 'em both!
Wanna know what I did? Here is the recipe for the crust. This the pizza crust recipe I've used for MANY years from Jeff Smith, AKA The Frugal Gourmet. Can you read this?

I don't follow the Frug's mixing steps. I just throw everything in my trusty Kitchen Aid Mixer with the dough hook, and let it do its thing until I have a pretty smooth, kneaded dough.

So let's just say that the dough had risen "enough"....

Sigh. Oh well. The Frug says that this amount of dough will make 3 pizzas, but I never make more that 2 with this much dough. I split the dough in half and started shaping one half into a large round and the other half into a rectangle. I prepped each pan with a drizzle of olive oil and a light sprinkling of cornmeal.
The round pizza pan - I like this pizza pan with the holes in the bottom, but I have also had success with a pizza stone. I just didn't take the time to dig out my pizza stone this time.

I prepped the rectangle parchment the same way.

I spread the dough on each pan and drizzled with olive oil.

And the rectangle.

Now, the Frug doesn't say to do this, but I've prepped my pizza dough this way for years with very good and very predictable results. I like to pre-bake my pizza crust to a twice-baked state. Ever bought or made a brown-n-serve roll? That's the concept here. This way the pizza crust is baked all the way through in the middle and not just around the edges. I have often found that if I only bake the pizza crust at the same time as the full pizza, the middle may or may not get done, even when using a pizza stone. If we all had brick ovens where the pizza sits on the bottom of the oven (what a pizza stone is intended to replicate), then we'd always have fully cooked pizza crusts. But we don't have brick ovens, so this is what I do instead.
I slid both crusts into a 300 degree oven for about 20 minutes until just baked but not browned. This sets the yeast and cooks the dough on top...


...and bottom. The crusts should release easily from the pan. If they do not, then I would put them back in the oven for another 5 minutes.

This is where I stopped Wednesday night and went to bed. These can be baked up to 2 days in advance, but wrap them well if it will be more than only a few hours before use. I have never frozen these crusts, so I cannot say how well they would freeze. I assume that they would freeze well, but I can't say for sure.
When I was ready to assemble the pizzas, here is what I did. I sauteed some thinly sliced Vidalia onion (for both pizzas) and then thinly sliced green pepper rings (for the smoked pork butt BBQ pizza).
The pesto pizza was very straight forward. I had made pesto previously (classic recipe) that I loosened up a bit with more olive oil. I also made a drizzle sauce of cream, tomato paste and Italian seasoning. No real measurements here, but it was about 3 T. of cream, 2 T. of tomato paste and 1 t. of Italian seasoning simply stirred together until well combined.

I'd never done this before, and I noticed that it thickened up from the tomato paste the longer it sat. This is right after I made it, so it's not as thick here as it got to be from sitting.

I spread the pesto on the crust and then sprinkled with about 1/2 cup of Asiago cheese before laying on slices of fresh tomatoes and a bit of the tomato cream drizzle.

A bit more cheese, and this one was ready to be slid into a 450 degree oven for about 15 minutes. Ah the aroma! Even before baking!

Here it is fresh from the oven....with an even better aroma than before baking!
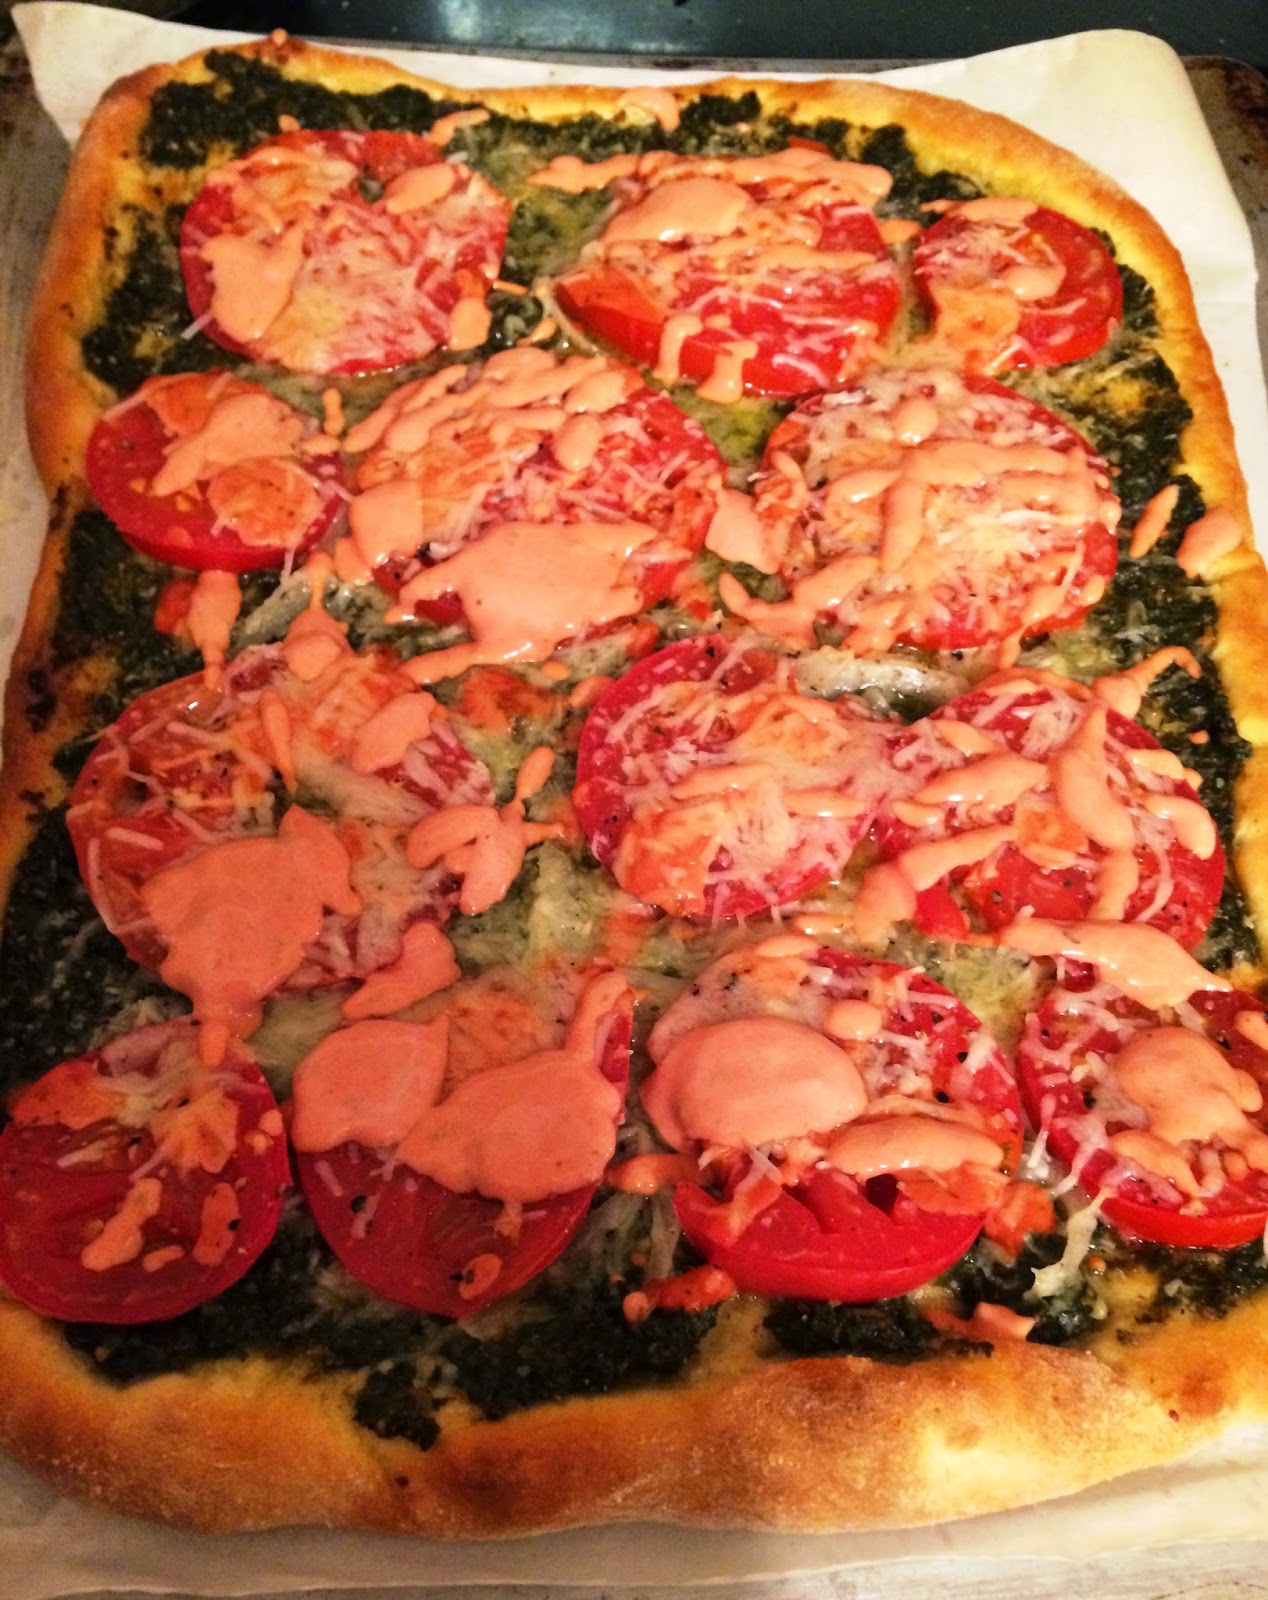

...and then garnished with fresh basil! Yum! Seriously, this was very tasty if you like pesto and tomatoes. One taste tester said it reminded him of bruschetta, which makes perfect sense since it's the same profile of ingredients. Another tester suggested fresh mozzarella, and she is absolutely right! I debated that idea but then decided to just use what I had on hand and didn't make another trip to the grocery store. Next time I may add the mozzarella!!

Now I turned my attention to the smoked pork butt BBQ pizza. My smokin' genius hubby, G, smoked a pork butt on Tuesday (because we needed space in the freezer for all those peaches!) This tastes great, so I took 2 slices...

...and chopped them up.

I spread the crust with a bit of tomato sauce, and then piled on the pork butt, the sauteed onion, green peppers, banana peppers, pepper jack cheese, cheddar cheese and BBQ sauce.

And then slid it in the 450 degree oven for about 15 minutes. This smelled WONDERFUL when I slid it out of the oven!

I'd never made a BBQ pizza before, but this is a keeper! My last step was to garnish with another drizzle of BBQ sauce and some fresh snipped chives.

And there you have it! Pizza for breakfast! Or lunch! Or dinner! One reader is wondering about doing these on a Big Green Egg, and while I have never tried it, I can't imagine why it wouldn't work. I imagine that to pre-bake the crust like I do would make working with it on the grill to be easier, and should not run the risk of over-baking the crust. But I look forward to hearing her results!
Thanks for stopping by! And look! I got this one posted on time! Woo-hoo!!!
Talk to ya soon!
Deb
No comments:
Post a Comment